Initial Configuration (via Web Browser)
In the previous article, we set up (at least) two network interfaces. The first, facing the Internet (the WAN) and the second facing the internal network (the LAN).
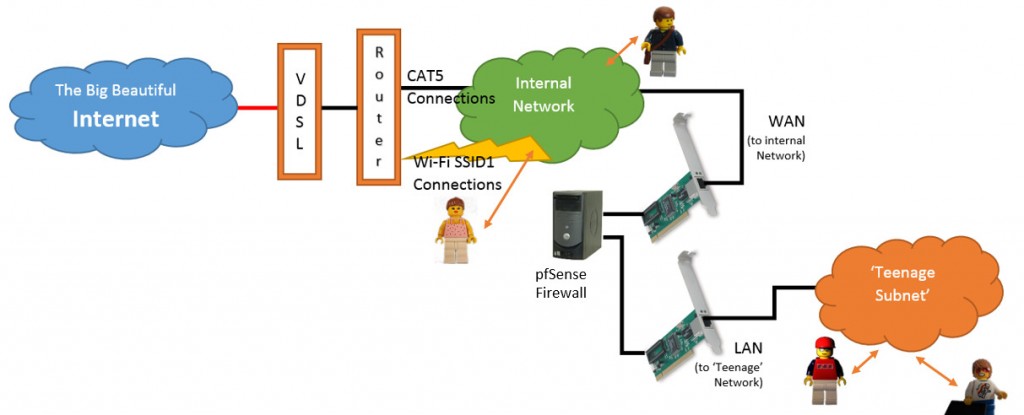
In our instance, our WAN interface will simply pass traffic onto our existing internal network, where it is subject to existing rules and management, while the LAN interface will become the first node of our new ‘Teenage Subnet’ through which our older boys (and possibly their friends) will access the network resources (including access to the Internet).

So, anyway, we have a machine happily whirring away running pfSense and two interfaces configured, the WAN and the LAN. Now we need to connect up and get things configured.
Connection and Login
- Connect the WAN interface to the internal network.
- Using a crossover cable (if the network cards do not support Auto MDI-X) or a separate network switch, connect a machine to the LAN interface to act as your first client. You may need to initially manually set the network address of this machine to something within the default 192.168.1.x range until you have setup a DHCP server on the LAN side.
- Point the web browser on the connected machine to the default pfSense server address: http://192.168.1.1, the default username is ‘admin‘ and password is ‘pfsense‘.
- Your browser will more than likely throw a warning about pfSense using a self signed certificate. This is fine, just allow the connection and continue.
Note: You will not be able to access the browser configuration via the WAN interface (for security reasons, the WAN interface is assumed to be Internet facing and thus a hostile network).
Setup Wizard
The first time you log into the web interface you will be presented with the ‘Setup Wizard’. This steps you through the more important configuration steps required to get your system operating. You can also run the wizard at a later point via the menu – ‘System’ > ‘Setup Wizard’.
- The first screen (Fig 1.) simply lets you know the wizard needs to be run.
- The ‘General Information’ collected (Fig 2.) includes the hostname of the server/firewall, the domain in which your network sits, and requests Primary and Secondary DNS server addresses.
For our build, we are going to call the domain ‘amberzone’ and use the OpenDNS server addresses (208.67.222.222
208.67.220.220) while unticking the ‘Override DNS’ box. OpenDNS allows us to set a range of browsing safety restrictions as well as providing some protection from known malware.
- Because we will be building rulesets based on the time of day, and also want to be able to produce meaningful reports of busy time and access, the timezone settings are important. The default pfsense NTP server address can be changed if you wish.
- The WAN Interface configuration allows us to set a static IP address, and adjust transmission attributes. If you are using the firewall to connect directly to a bridged router, this is where you would configure your PPPoE / PPTP settings.
For our purposes, we simply want to assign an available IP address from within our existing home network, and add the ‘Upstream Gateway’ address. You can check your home network details by typing ‘ipconfig /all’ into a windows command prompt, or using ‘ifconfig’ in Linux based systems
For the purposes of this guide, the WAN address is set to a ‘Selected Type’ of ‘Static’ the IP Address is set to 192.168.0.10 / 24 and the upstream gateway is 192.168.0.1
- The next screen (Fig 5.) allows us to enter a static IP address for the LAN side interface.
The default setting of LAN Address: 192.168.1.1 and Subnet Mask’ /24 should work fine unless your main network is already using 192.168.1.x/24, if this is the case you could use 192.168.2.1 /24 for instance.
- Choosing an Admin password (Fig 6.) should be done with care, especially if you are planning to use the segmentation to deny access. Kids are smart, really smart, and they will figure it out if the administrator password is the name of the family dog.
- That’s all the configuration we need for now, the penultimate screen (Fig 7.) requires you to reload the firewall and use the new settings.
- Finally, the Wizard complete screen is displayed (Fig 8.). I would encourage you to consider making a donation to the project, it all adds up and it helps fund future development.
- Clicking to continue to the pfSense WebConfigurator will display you a page something like (Fig 9.)
- That’s it! For the most part the system should be up and running and connecting through your home network and on to the internet.
Next Article: pfSense Firewall [Part 3: Monitoring Your Network]


Comments
One response to “Tweaking the Home Network – pfSense Firewall [Part 2: Initial Configuration]”
Good Post Rob. Having a separate SSID for guests is something I’ve thought about but this takes it to the next level.