One of the concerning requests of Xbox Live connectivity, is to enable UPnP or ‘Universal Plug and Play’ on your home router.
The UPnP protocol has a long standing history of security problems, not the least of which being that it allows unauthenticated devices to connect to and through your home network. In the past, I have advocated for this to be switched off by default in consumer grade routers and I explain the UPnP threat in another post.
Getting back on track, my security conscious view for our home network does nothing for a teenage boy who received an Xbox Live subscription for his birthday and, while some aspects of the Live subscription work, others – such as game sharing will fail. With this in mind, we need to setup port forwarding, rather than implement UPnP, to connect said teenager to his gaming buddies and keep our network free of the risks introduced by enabling UPnP.
Our network has a wired Xbox connecting through an OpenWRT router and out to the interwebs. For those running the firmware which came with your modems, you should be able to follow the instructions here – I have not used these guide so, check first and proceed with caution.
Before you get too carried away fixing a problem which may not be there, first check out the current Xbox Live status here.
There are several parts to this process:
- Find your Network Settings.
- Determine the Xbox MAC address.
- Set a static IP address on the Xbox.
- Configure a Static IP lease on the router.
- Create the port forward rule(s).
- Test the Xbox connectivity.
Grab a laptop and turn on the Xbox. You’ll need to switch between both during this HOWTO. If you are unsure of your network settings, you may want to grab them before you carry on.
Find your Network Settings
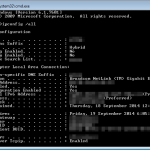
From Windows, open a command prompt (Start > Run > CMD) and type:
ipconfig /all
For Linux, open a terminal window and type:
ifconfig
then (assuming eth0 is your network connection, if you are using wireless you will probably want to type wlan0 rather than eth0):
nmcli dev list iface eth0 | grep IP4
From the long list of text that appears (you may need to scroll up the window a little) you will see the network connections and their values. For Windows it will look something like (Fig 1.), for Linux it will look something like (Fig 2.).
The settings you are interested in are the IP Address ?, the Subnet Mask ?, the Default Gateway ?, and your DNS Server ?.

Determine the Xbox MAC address
This may be as easy as looking in your routers DHCP table, or you may need to delve into the menus on the XBOX.
OpenWRT Router DHCP Leases
- From a browser, access the router configuration page (usually at http://192.168.1.1)
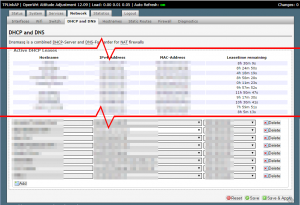
- Login and click the ‘Network’ Tab, then ‘DHCP and DNS’
- Scroll down the list to ‘Active DHCP Leases’ (Fig 3.)
- If you can see the XBox leased here, then great! You can skip to the ‘Set a static IP address on the Xbox’ step.
- If there is no obvious lease belonging to the Xbox, that’s fine, move down to the next section ‘Xbox MAC Address’
Xbox MAC Address
- Grab an Xbox controller and hit the ‘X’ symbol in the middle to bring up the ‘XBox Guide’
- Use the arrow keys to go to ‘Settings’ > ‘System Settings’ > ‘Network Settings’
- Choose your ‘Network Type’, in my case ‘Wired’
- ‘Configure Network’ > ‘Additional Settings’ > ‘Advanced Settings’
- Note down the MAC address. We will be using this to setup a static IP lease in the router.
Set a static IP address on the Xbox
- If you are still in the Network ‘Advanced Settings’ screen from the above steps, hit (B)ack
OR
- If you are at any other screen in the Xbox menu, hit the ‘X’ symbol in the middle to bring up the ‘XBox Guide’
- Use the arrow keys to go to ‘Settings’ > ‘System Settings’ > ‘Network Settings’
- Choose your ‘Network Type’, in my case ‘Wired’
- ‘Configure Network’ > ‘Additional Settings’
- From the network screen, choose ‘Basic Settings’
- Select ‘IP Settings’ > ‘Manual’ > ‘IP Address’ > [Enter an IP Address for your Xbox] > Click ‘Done’
- Select ‘Subnet mask’ > [Enter your Subnet Mask(?)] > Click ‘Done’
- Select ‘Gateway’ > [Enter your Gateway IP Address (?)] > Click ‘Done’.
- Click ‘Done’.
- Select ‘DNS Settings’ > ‘Manual’ > ‘Primary DNS Server’ > [Enter your DNS Server Address (?)] > Click ‘Done’.
- ‘Secondary DNS Server’ > [You can enter your ISP DNS Server Address, or the Google DNS Server Address, or the OpenDNS Servers] > Click ‘Done’.
- Click (B)ack
Configure a Static IP lease on the router
- From a browser, access the router configuration page (usually at http://192.168.1.1)
- Login and click the ‘Network’ Tab, then ‘DHCP and DNS’
- Scroll to the ‘Static Leases’ section at the bottom of the page (Fig. 4).
- Enter the following:
- in ‘Hostname’ type ‘XBox360’,
- in ‘MAC-Address’ select the MAC address we noted down earlier, or if it is not displayed, click ‘–custom–‘ and enter the MAC address in the format aa:bb:cc:dd:ee:ff
- in ‘IP address’, click ‘–custom–‘ and enter the same IP address you set manually on the Xbox.
- Click the ‘Add’ button, and then click ‘Save & Apply’

Create the port forward rule(s)
- From a browser, access the router configuration page (usually at http://192.168.1.1)
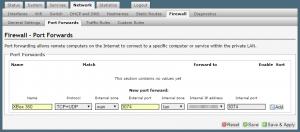
- Login and click the ‘Network’ Tab, then ‘Firewall’ > ‘Port Forwards’ (Fig. 5)
- Enter the following:
- in ‘Name’ type ‘XBox 360’
- in ‘Protocol’ select ‘TCP+UDP’
- in ‘External zone’ select ‘wan’
- in ‘External port’ type ‘3074’
- in ‘Internal zone’ select ‘lan’
- in ‘Internal IP address’ select ‘[TheAddressYouCreatedin ‘Configure a Static IP lease on the router’]’
- in ‘Internal Port’ type ‘3074’
- Click the ‘Add’ button, and then click ‘Save & Apply’
Test the Xbox connectivity
Switch back to the Xbox and run a test connection. All things being equal, you should connect to the Xbox live service. If not, you may need to repeat the port forward step adding the following ports (one at a time, in order, testing after applying each forwarding rule).
- Port 88
- Port 53
- Port 80 (TCP only – in rare cases, most likely not needed)
Happy gaming! (or at least, mildly happier teenagers)