Koha is a fully featured, scalable library management system.
 So, I thought I’d set up Koha on a virtual machine to have a bit of a play, and maybe use it to manage our library at home.
Create the virtual machine
I’m using VirtualBox as my VM manager, so – first off we create a new machine, give it a name and set the type to ‘Linux, Debian (64-bit)’ as Koha is most often deployed on Debian servers.
The default settings (512MB RAM, 1 Processor, 8GB HDD) are fine, and we will set the network card to be a bridged adapter (which will give it its own IP address on our local network). For now so all that remains is to point the CD to the latest Debian installation image. I am using the network install as this machine will only be built with what Koha needs and thus I don’t need to pull down local copies of a bunch of things we won’t install. So, let’s start the VM and get on with the installation.
Install Debian
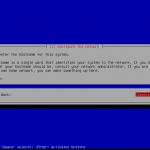
- On the first boot you will be presented with a screen of options (Fig 1), select ‘Install Debian’.
- ‘English’ is the language, I am in ‘New Zealand’, and we will use the ‘American English’ keymap
- Now the installation will kick off and configure a bunch of things before it asks us to name the machine.
- Just for the sake of simplicity, I will be using the host name ‘vm-koha’ (Fig 2)
- You can enter a domain name if relevant, setup your root password, setup your user name (I used ‘Koha User’ and ‘koha’), set a user password and select your timezone.
- We’re going to use the ‘Guided- use entire disk’ partitioning and put ‘All files in one partition’ because we’re just having a play and don’t need to be too clever with setting disks and partitions outside the default schema.
- Finish partitioning and write the changes to disk, confirm the changes, then go grab a coffee as the system files are installed.
- The installation is fairly quick, but will depend on your internet speeds as it downloads the modules required (assuming you started with the minimal, network installation Debian image.
- We need to choose our closest file mirror, for me this is ‘New Zealand’ (Fig 3), and select the Debian archive mirror (Fig 4).
- Set your proxy (if relevant), and return to sipping your coffee as the progress bars tick by.
- You can choose to opt-in or out of usage reporting, but remember that the developers use this information to help improve the packages – so helping out is part of being a good community member.
- The software selection screen (Fig 5) allows us to select the packages we need.
- You can either select ‘Web server’, ‘SQL database’, ‘SSH server’ and ‘Standard system utilities’ (all of which Koha uses), or
- You can choose only ‘SSH server’ (for remote connection) and install other dependencies as required. This way we leave out any packages that we do not absolutely need to run our Koha installation.
- Install GRUB to the master boot record, and we’re all but done.
- Choose ‘Continue’ to complete the installation.


First Boot
After installation, the system will reboot and present you with a login prompt. Enter your username/password that you selected during the Debian install.
Got root? – If you want to use sudo, you will need to add the sudo command (if is it not installed) as well as add your user to the sudo users group.
su -
apt-get install sudo
sudo usermod -aG sudo
You may need to reboot after this step to activate the changes
Set a static IP address
sudo nano /etc/network/interfaces
Comment out the DHCP line,
# iface eth0 inet dhcp
and add the following
iface eth0 inet static
address [The static IP of the Koha VM]
netmask 255.255.255.0
gateway [Your.Networks.Gateway.Address]
network [First.Three.Octets.0]
broadcast [First.Three.Octets.255]
dns-nameservers [IP.Address.Of.Name Server]
save the file.
Getting and installing Koha
(from: http://wiki.koha-community.org/wiki/Debian)
create the koha sources list
sudo nano /etc/apt/sources.list.d/koha.list
and enter the following for the STABLE release
deb http://debian.koha-community.org/koha squeeze main
save the file
Get the signing key
wget -O- http://debian.koha-community.org/koha/gpg.asc | sudo apt-key add -
then we’re ready to update our sources and install koha
sudo apt-get update
sudo apt-get install koha-common
Then you need to follow through the instructions at the wiki link above, or read the provided documentation
less /usr/share/doc/koha-common/README.Debian
Define the servername by replacing with your servers name in the following command:
echo "ServerName " | sudo tee /etc/apache2/conf.d/fqdn
Enable Apache mod_rewrite module, and restart Apache
sudo a2enmod rewrite
sudo service apache2 restart
Install mysql
sudo apt-get install mysql-server
Enter a password for the mysql installation (Fig 8)
Create the Koha Instance by entering the following
sudo koha-create --create-db instancename


Now, in theory, you should be able to access your Koha install via http://[TheIPAddressOfYourVirtualServer]
This didn’t happen for me, and I am still presented with the default “It Works” page..
YMMV, but for now I’m tossing it in until I get some more spare time to track down what needs changing to make this work. Let me know in the comments if you get a win (and what you had to do to get there 🙂 )